Quick summary
Learn how to prepare print-ready files with correct size, bleed, margins, colors, resolution, and PDF settings for sharp and professional printing results.
When a print job looks sharp, clean, and professionally finished, it usually starts long before the printer begins working. Good printing is not only about design. It is also about how the final file is prepared.
At Sanavi Print Point, we often see a common issue. Customers create a beautiful design, but the final print does not match expectations because the file was not set up correctly. Small mistakes like missing bleed, low image resolution, incorrect colors, or unembedded fonts can affect the final result.
If you want your visiting cards, brochures, flyers, stickers, letterheads, or marketing materials to print perfectly, this guide will help you prepare your artwork the right way.
You can also explore our homepage for printing solutions and product options at Sanavi Print Point.
Why File Preparation Matters in Professional Printing
A print-ready file helps avoid delays, rework, and unexpected output problems. When your file is properly prepared, it becomes easier to achieve:
- accurate trimming
- better color reproduction
- sharper text and images
- correct alignment
- faster production approval
In professional printing, the final output depends heavily on technical file setup. Adobe explains that print production tools rely on page boxes such as trim and bleed for correct page positioning, placement, and output handling. Learn more.
That means even a strong design can fail in print if the technical setup is incomplete.
The Most Important Rule: Design for Print, Not Only for Screen
A design that looks perfect on your laptop or mobile screen may still print differently. This happens because digital screens use RGB color, while print production commonly works best with CMYK color workflows. HP explains that RGB is suited to screens, while CMYK is ideal for physical print output. Read more.
So, if you are preparing files for brochure printing, business card printing, flyer printing, or any custom print job, you should always think in terms of print settings from the beginning.
1. Use the Correct File Size from the Start
The first step in preparing print-ready artwork is choosing the correct document size.
Visiting Cards
Create the file at the exact card size required by your printer.
Flyers and Leaflets
Set the document size based on final trimmed dimensions.
Brochures
Create the file with proper page size, page count, and folding consideration.
Stickers and Labels
Use the exact finished size and shape requirements.
If the file size is wrong, resizing later can affect alignment, text spacing, and image quality. Starting with the correct size saves time and keeps the design accurate.
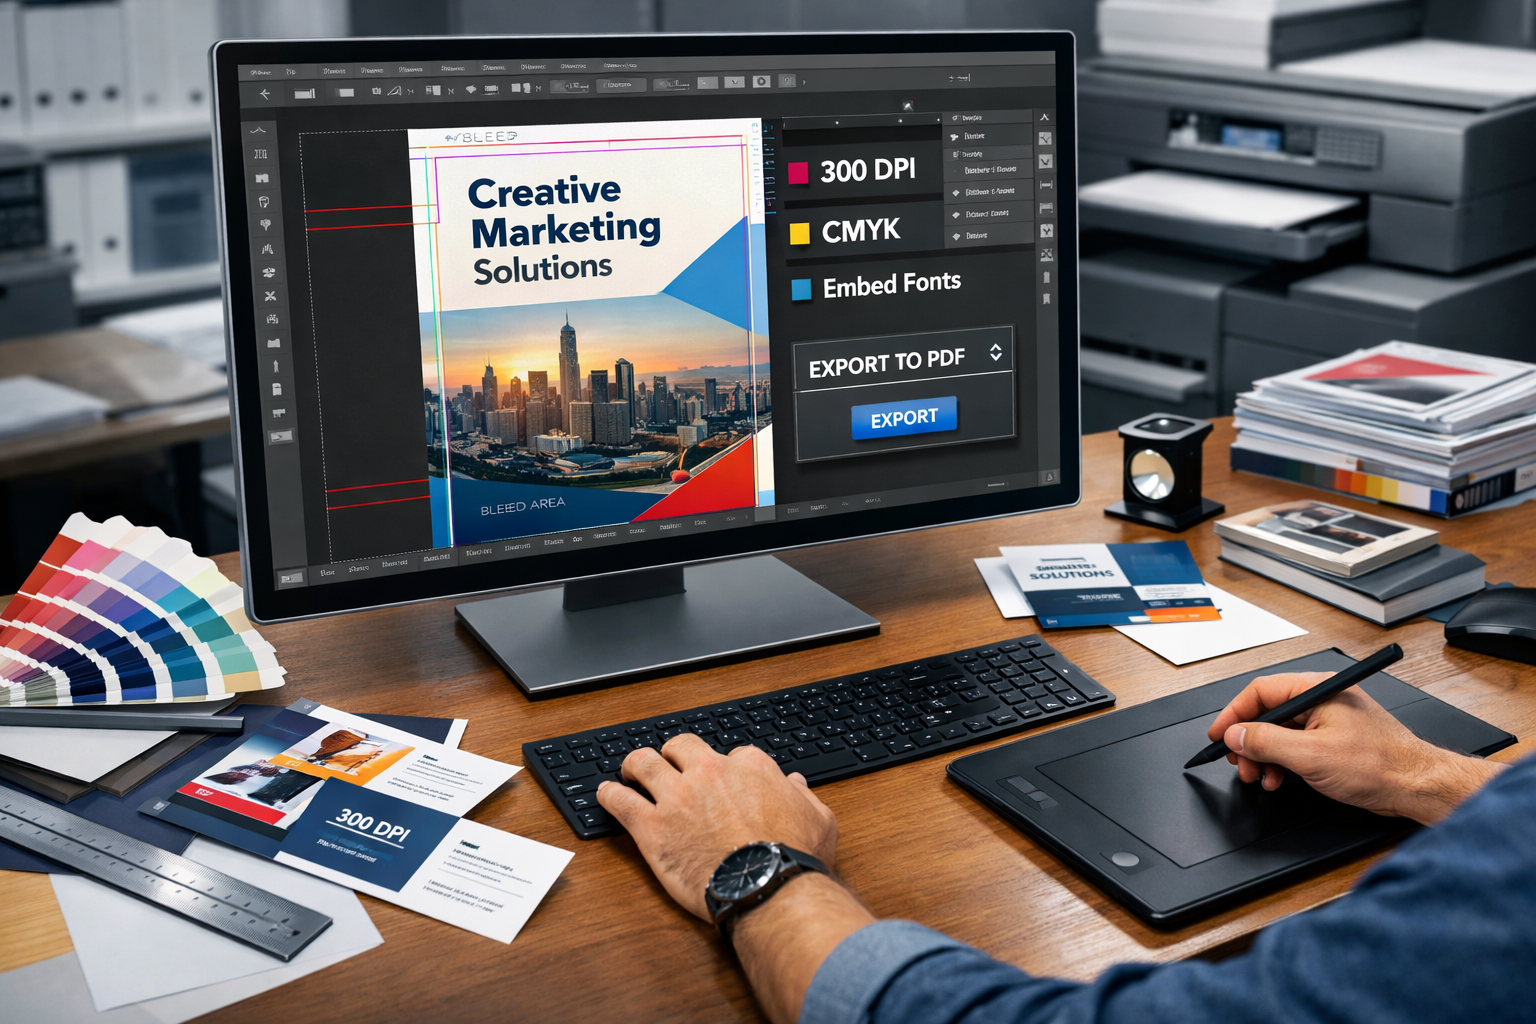
2. Always Add Bleed
Bleed is one of the most important parts of file preparation.
Bleed is the extra design area that extends beyond the final trim size. It helps prevent unwanted white edges after cutting. Adobe states that bleed areas extend beyond the final page and are discarded after trimming. Canva also recommends enabling bleed to avoid unintended white edges. Adobe guide.
Why bleed matters
In commercial printing, trimming is precise, but no physical cutting process is absolutely perfect. If your background color, image, or pattern stops exactly at the edge of the final size, even a tiny cutting shift can create a visible white line.
Good practice
Extend background colors, textures, and images beyond the trim line into the bleed area.
A common print standard is 3 mm bleed on each side, but exact requirements may vary by product and printer. Before final submission, confirm the needed bleed with your print partner.
3. Keep Important Content Inside the Safe Area
Adding bleed is not enough. You also need to protect the important elements inside the layout.
The safe area is the inner margin where your key content should stay. Items like logos, names, phone numbers, addresses, offers, and headlines should not be too close to the edge.
Keep these inside the safe area
- business name
- contact details
- pricing text
- QR codes
- logos
- taglines
- important product visuals
Canva recommends checking margins and bleed together so essential elements stay safely inside the design area. See Canva guide.
This is especially important in visiting card printing and brochure printing where the trim is very visible.
4. Use High Resolution Images
Low quality images are one of the biggest reasons prints look unprofessional.
An image that appears okay on WhatsApp, social media, or a website may print blurry or pixelated. For professional print material, high resolution images are important.
What happens with low resolution images
- blurry product photos
- soft text inside artwork
- jagged edges
- poor brand presentation
For print-ready PDFs, Canva notes that PDF Print output is designed for printing at 300 dpi. Read Canva help.
Best practice
Use clear, original, high resolution images and avoid screenshots wherever possible.
This matters a lot for:
- catalogue printing
- menu printing
- poster printing
- brochure printing
- product label printing
5. Convert Colors Properly for Printing
Color is one of the areas where customers notice differences most quickly.
As mentioned earlier, RGB is for screens and CMYK is for print. Because these color spaces work differently, some bright digital colors may look less vibrant when printed. HP explains that RGB and CMYK use different color models and that CMYK is the correct choice for physical print production. Read more.
Common color issues in printing
- neon shades look duller in print
- dark backgrounds print heavier than expected
- black text becomes soft if built incorrectly
- brand colors shift slightly
Practical tip
If your brand depends on exact color consistency, discuss color expectations before printing large quantities.
For premium marketing materials, file preparation and color setup should be checked carefully before final approval.
6. Use PDF Print Format for Final Submission
Many customers send JPG, PNG, or editable files, but for professional printing, PDF is usually the safest format.
Adobe explains that PDF settings affect print performance through image quality, font handling, color management, and industry compliance. Canva also states that PDF Print is intended for print with options like bleed, crop marks, and color profile selection. Adobe PDF settings.
Why PDF works best
- layout stays stable
- fonts are handled more reliably
- images stay placed correctly
- it is easier to preserve print settings
- output is more consistent across systems
Before sending your PDF
Check:
- page size
- bleed
- crop marks if required
- image quality
- final spelling
- page order
- alignment
7. Embed Fonts or Convert Text to Curves
Fonts can cause hidden problems in print files.
If a font is missing on another system, the design may reflow, line breaks may change, or text may get replaced. That can affect the entire layout.
To avoid font issues
- embed fonts in the final PDF where possible
- or convert important text to outlines or curves before export
- always proofread after conversion
This is especially useful for logo-based artwork, premium invitation printing, and brand stationery.
8. Use Crop Marks Only When Needed
Crop marks help indicate where the final trimming should happen. Adobe and Canva both provide options for printer marks, bleed, and crop marks in their print workflows. See crop marks guide.
But crop marks are not always required for every print job. The best approach is to follow the printer's file submission guideline.
Simple rule
If your print partner asks for crop marks, include them correctly. If not, focus on correct size, bleed, and safe margins.
9. Check Page Order for Multi Page Documents
For brochures, booklets, catalogues, and menu cards, page order matters a lot.
Before sending final artwork, review:
- total number of pages
- front and back sequence
- fold logic
- inside and outside panel order
- orientation
- page numbering
A beautiful brochure can still fail if pages are placed in the wrong order.
10. Proofread Everything Before Final Approval
Printing mistakes are expensive because once the job is printed, corrections usually mean reprinting.
Before final submission, read every line carefully.
Check these items:
- spelling
- mobile number
- email address
- website URL
- address
- GST number if applicable
- product details
- dates and offer validity
- QR code scan test
This is one of the simplest but most valuable print file preparation tips.
11. Flatten Transparency and Review Effects Carefully
Modern designs often use shadows, gradients, overlays, transparent elements, and special effects. These can look great on screen, but they should still be checked carefully before printing.
Watch out for
- unexpected color shifts
- missing layer effects
- transparent objects not exporting correctly
- hairline borders appearing after PDF export
Adobe’s print production tools are specifically designed to help identify and manage print-related issues in PDF files. Read more.
If your design contains complex effects, export a final proof PDF and review it at high zoom before submission.
12. Ask for a Final Check Before Bulk Printing
If you are printing in quantity, always ask for a final approval stage.
This is very important for:
- business cards in bulk
- brochure campaigns
- packaging inserts
- labels
- wedding cards
- event material
- corporate stationery
A quick final review can save money, prevent delays, and protect your brand image.
At Sanavi Print Point, careful pre-print checking helps customers avoid common file issues and get cleaner output.
Common Mistakes Customers Make While Preparing Files for Printing
Here are some of the most common file submission problems:
Missing bleed
This often causes white edges after trimming.
Low quality images
This leads to blurred or pixelated prints.
RGB artwork instead of print-ready color setup
This can create color mismatch in final output. Read more.
Text too close to edges
This risks content getting cut during trimming.
Sending editable design files only
This may cause font and layout issues on another system.
Not checking final contact details
One small typo can ruin the usefulness of an entire print run.
A Simple Print Ready Checklist
Before sending your file for professional printing, review this checklist:
Print file checklist
- correct final size
- proper bleed added
- safe margin maintained
- images high resolution
- colors prepared for print
- PDF exported properly
- fonts embedded or outlined
- spelling checked
- contact details checked
- page order confirmed
- crop marks added if required
If all these points are covered, you are already much closer to perfect printing results.
Helpful Resources for Better File Preparation
These official resources are useful if you want to understand print setup in more detail:
- Adobe guide on printer marks and page boxes
- Adobe guide on setting bleed in InDesign
- Canva help for margins, bleed, and crop marks
- Canva help on PDF Print export
- HP guide on CMYK vs RGB for print
These sources explain why bleed, trim, crop marks, PDF settings, and color mode matter in real print workflows. Read more.
Final Thoughts
Perfect printing starts with proper file preparation.
Good design is important, but print-ready setup is what turns that design into a clean, professional final product. When your file has the correct size, proper bleed, safe margins, print-friendly colors, sharp images, and a reliable PDF export, you reduce errors and improve print quality.
If you are preparing artwork for business cards, flyers, brochures, labels, or other marketing materials, following these steps will help you get better results.
For custom print requirements, product options, and support, visit https://www.sanaviprintpoint.com.
FAQ
What is bleed in printing?
Bleed is the extra area that extends beyond the final trim size so that background colors or images continue past the edge. This helps avoid white borders after cutting. Adobe and Canva both explain bleed as part of proper print preparation. Learn more.
Which file format is best for printing?
PDF Print is usually the best format for professional printing because it preserves layout, supports print settings, and can include bleed, crop marks, and color profile options. Read more.
Should I use RGB or CMYK for print files?
For physical printing, CMYK is generally the better choice, while RGB is intended for digital screen display. Read more.
Why do printed colors look different from screen colors?
Screens display RGB light, while printed materials use CMYK inks. Because the color systems are different, some shades can appear different in print. Read more.
Do I need crop marks in every file?
Not always. Crop marks may be required for some print workflows, but the exact requirement depends on the printer and product. Adobe and Canva both support crop mark options in print export workflows. Learn more.
What resolution should images be for printing?
For quality print output, high resolution images are important. Canva’s PDF Print format is intended for printing at 300 dpi. Read more.